London based Post-graduate with a passion for games and game design!
Showing posts with label Environment. Show all posts

28 Feb 2017

KittyKABOOM Level Design


To crate the environment for the level, I first took a birds eye view screen shot of the grey box and ternt it into a template for the modelling proses. I new I wanted the first level to be on the street where Margret lives, to show that the mice have taken over and the after math of that. When doing the concepts for this, I had a hard time trying to draw what this normal street would look like which aliens taking over. As environment art is my weakest aria, I really strugled with trying to produse something that I was happy with quality wise. I desied to simply finish the normal street, then work on modaling the other assets so tha tI could try dressing the street in Unity and Maya. 


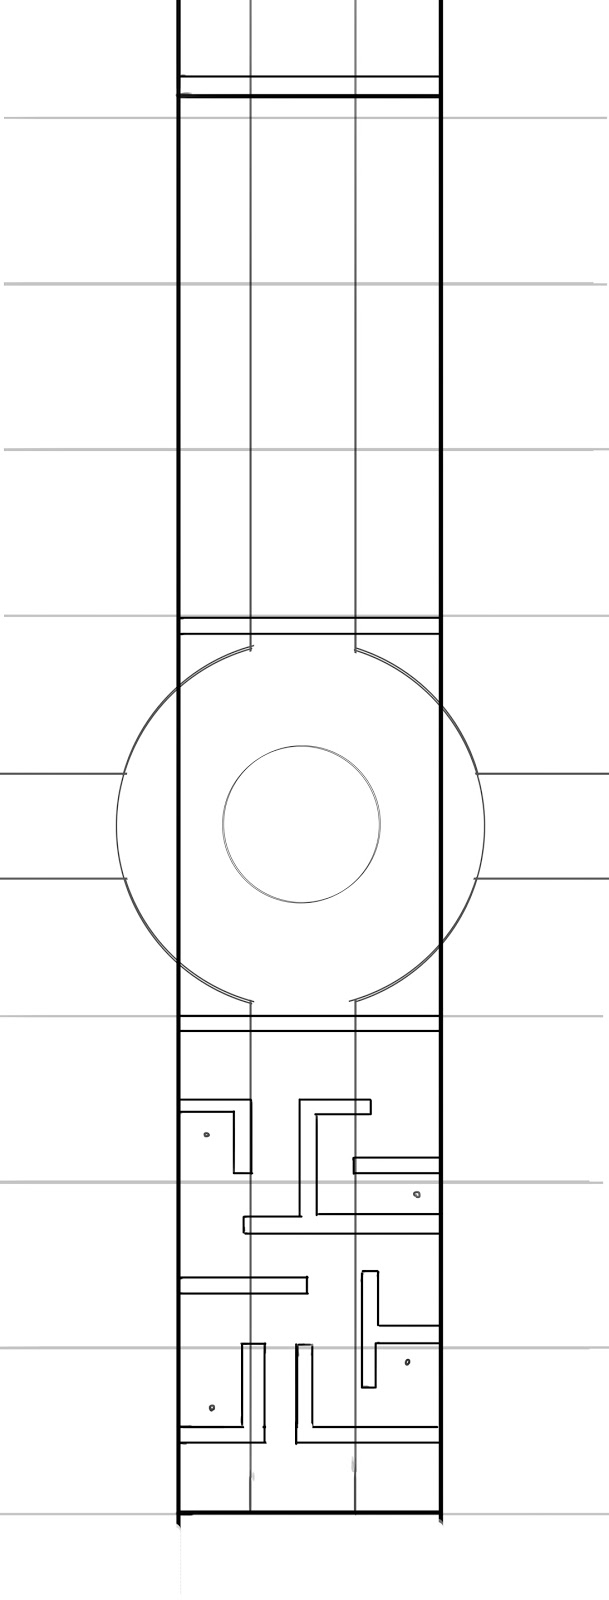
To make sure the modled environment mached that of the gray box, I took a birds eye screen shot of it then drew a map over it in Photoshop. I then used this as the template for modeling the level. At first, I was going to make the maze part out of different things from the steeet that had been knocked over or crashed into to form the shape of the maze. I wanted to do this to show how the people had goten into panic once the mice invaded. However, after modeling the assets, I realized that making the maze in this way looked very disorganized and nonsensical. Specially as the player would be in a tank, so realistically they could just run over thses things. So insted I desdied to change it to a maze that the mice set up to stop people from running about freely. It would also reflect the motif of putting mice in to mazes.


To deside what the  walls for the maze should look like, I started with some quick sketchs, but then thought to be would easier and quicker to try modeling different versions as a way of consepting them insted. This really helped as I could see what they will look like all around as well as hopw meny polys each design will take. Once I had designed on a design, I used this to make the maze and other barrias that the Mice had put up.


When texering anything for this game, I made sure that the colors are a little duller then intened, as the toon shadier make everything much more saturated in game. I moved the round about to the boss aria as it made more sence for the larger space to be for the bigger fight. At first, I thoght I was going to put the boss at the center of the round about, but as I changed it to the cages I added the tern sight to the centr insted. The edges of this aria was also very bland, so I modled a tree and changed the scaling around to add some veried trees.


For the items that the player can pick up, I wanted them to be easily identifiable, but still relate to cats in some way. I went with the plus for the health as it had instant understanding as health, so I felt there was no resion to confuse that. I thought about using the heart, as a lot of the environment was green so I was worried tha the green plus would clash with this. But making it a heart when the UI was a slider I felt confused the conection, so I would have to change the health to hearts also. But this would mean I would have to re-code how  the health worked, which I didn't want to waist time with.


21 Nov 2016

KittyKABOOM Tank Consepts

 Before makeing the tank, I desided to design the player character, as I find making characters easier. Also, if I had a better idea of the character, it might help me make the tank. I defiantly wanted the character to be a old, short lady, as i think the juxtaposition of a small old lady in a tank will be funny.

  
In the end, I went with the more wild look for her, as I felt it would be funnier if she had a very head stong and loud personality. It also made her look more like a cooky old lady, which I think makes more sence then a very quite, sesable lady, as she was sabost to be based on a crazy cat lady. 


Once a had done the lady, I then used that to help me think of what her tank would look like. I tried out some diffrent shapes, themes, and even diifrent viacels to make some tank designs. I liked the steam punk and needled themed ones, as they seemed very had made, and the thoght of her making the tank herself would add to the humor. However, I felt like for this kind of game, the design needed to be more simplistic design, as over complicaing it could make everything confusing. Asesaly if things alrady look like cats and mice. Also, when making the game, so far the camera distance had been quite far from the tank, so if I make the design, too complex, it may not be seen anyway, or even worse become confusing. 

I didn't want to confuse the visuals, so I desided to go for a simplistic design for the tank. This way it will be eaier for players to instantly see that it its a tank and also a cat. I also wanted to work on some colours as well, to make sure the tank really looked cat like. For this progect I wanted to work on consepting skills I'm not very good at, but for this drawing I used my normal style of quick line art and simple shading as its much qucker to do. After seeing this my teacher thoght this style worked well with the quircky idea of the game and it was more toonish. After debating it, I deaided to go forward with the new style as I'm more comftable with it so it will make creating the consepts faster and look better then trying to strugle with a style I'm not so used to.


Going forward with this style I made the model sheet for the tank. There where some parts of this that I struggled with as I couldn't visualize what the tank would look like in 3D. Because of this, some of the line work looks out of place and even mismatched in the different views. Even thogh I could see this, I didn't wont to spent to much time on it as I knew I could work out how these things would look butter once I started modeling them. If I was to send this reference on to someone else, I would have possible modeled parts of it in Maya fist so that the drawing was more accreate, but as I am working by my self this wasn't needed.

The problems I was having drawing some parts of the tank was quickly fixed once I started modeling as i was able to better see how the shapes would work together. To make the tracks for the tank I followed a tutorial that used a curve the help mold the shape I needed the tracks to follow. I also try to use this method and others to try and animte the tracks, but I coden't get this to work. The tracks where sapost to move along the curve but instent they would just rotate around its pivot. As this was taken too long to try and implement I desided to scrap it. However, because of this, the tank looked very bizarre when moving as the tracks where very obioaly not moving. To try and desicse this I desided to ass track covers to the tank as well. This work out better then I thought as the covers pushed the cat look even more and the paws where resived very well by testers. I did in the end deside to animate the wheels as that was much simpler and helped the tank look as if it was moving.  


17 Mar 2016

New Eden Mobile: Environment Assats


For the enviroment, I wanted the assaects to look like they're part of the same world of the Pc verson, but with the simpiler design. I ended up changing the platforms to make them less copicated, but this looked too dull, so I added some carvings to the side. When doing the tree, I wanted to add vines and moss to make look less neat and more overgrown. This also helps make it look more jungaley. I desided to only model the platforms as I felt the tree might take too long as the unwrap and the texturing would be tricky. 


I still felt like the tree wasn't really fitting to the jungle theme, so I used the strangle tree idea from the PC version and worked that into this tree. I feel like this helped it look more fantasy like and exotic then the tree before. I also took off the extra vines and moss as it started to get difficult to tell the decoration apart from the inheritable parts. 


15 Feb 2016

New Eden Mobile: Sketch Book Studies


To understand what assets I have to make, I started by drawing out some level designs for the game. At first I thought about making an endless runner, but that seemed quite boring, and I wanted the stelf element of the PC version to included in the mobile one. I then tried out some normal side stroller ideas, but this still felt too far different and ganeric I then thought of a platformer that works more like a puzzle game, in that the player would have to try and avoid enamys and use the environment to reach the goal. I also did some skeches of diffrent cartoony styles for the character. I wanted it to be much smaller and more simple the the PC version so it would take less polys and be easier to model.


Once I had modeled the character, I did some sketches of the kind of poses I wanted to her to be in. This helped me to see where the joints needed to be when posing it in Maya.
I also started designing the enamies. I wanted one to be some form of big cat or wolf, and the other be a flying animal. I wanted all the animles to look alien, so show the game isn't based on earth, so I tried to mash different animals together.


I wanted there to be somthing for Tarrin to colect at the end of each stange as the goal, so I drew up some madalian designs as this fit the Aztec theme of the world. I thought it would be boring to colecty the same thing each level, so i thoght of braking it apart and having the player collect all the peases. This give the game more of a goal and naritive.

23 Mar 2015

Ally way textures


We where given this alleyway and templates for the UVs so that we could give them textures. I enjoy doing texture work as its mostly about editing images which i can do pretty quickly. I also like experimenting with different layer types to get different effects. 
I added a lot of stress and age to the textures using other images of cracks and moldy concrete. Some parts like the rivets and rust I made using different brushes and layer values.  


I use the stamp tool a lot when applying textures to get rid of the hard edges of the image. It also makes the texture more random and natural.


We added the texture as a DirectX 11 Shader, but for some reason, it started to not show my texture and insted made everything black or green. So I used Lambert ones instead. It made them come out a little duller then before, but I didn't know how to fix the hypershade.

8 Dec 2014

Building Assiment

Our end of term assortment was to model and texture a temple from a image. It took me a very long time to do but I'm feeling pretty proud with the results.
I first started with the main body of the building which I made using a cube and exstutions. By doing multiple exstutions at different offsets I was able to get the shapes needed. To make the indesnts for the windows and doors I used the edge loop tool to make the faces then exstuded them inwereds. I also used exstrutions to make the pilers and spike at the top of the middle building. The part of the roof that stick out from the balcony roof was done using the interactive spit tool to make the shape and then extruded it. I found this very tricky to get right and then the outcome wasen't as good as I'ed like. For the rest of the roofs that stick out I made the shape using a flat cube, duplicating it and flipping it and then merging the vertexes together. I then duplacaed this. As it was a septet object, I found it hard when trying to make them seem connected The scatting around the edges where made using a cube with sevril edge loops so that i could make it the right shape. I then duplicated it over and over to continue the pattern.

Once done I moved on to texturing it. Most of the parts had just plane colour so I just made sure to colour them before I duplicated them. Adding the textures was trickier as I needed to add different textures to one object, as most of the building was made from one cube. Also, as I added so many edge loops, many off the edges needed sawing together so that the brick lays right. I had also deleted some of the edges but kept the stray vertexes, so my UVs became very irregular shapes. After playing around with it too much, they become very jumbled and I couldn't undo it. So I can to move and saw the edges by hand and also remove the unneeded vertexes.

When applying textures I also use a blin, which I didn't realize makes everything shiny. By the time I realized I had already finished unwrapping it. 


23 Nov 2014

Gas Pump

Old rusty gas pump modelled in maya and texture made in Photoshop

I found modelling this quite easy as it is very simple but I did have some trobble applying the texture. The bump map didn't work which makes the pump look very simplistic so I tryed adding the bump effects into the painted texture just to make it look more shapely.

31 Oct 2014

One Point Perspective

one point perspective drawing with water colour
I've worked on perspective drawings before in my graphics classes, so I didnt find this too hard. I did however have trouble drawing the truing point on the bridge.

Dining Set

Chairs and tables made in maya with a wood grain texture made in Photoshop
What I found the hardest about this was unwrapping the curcaler chair. As it has such a irregular shape you have to unwrap most of it by hand in sepret parts.

14 Oct 2014

Tools in Maya

Maya Tool, UV mapping and Texture practice
I didn't realize there was a split in the hammer rust until I uploaded it onto here.